Compound bows are epitome of modern archery. They are the technologically most advanced bows, they are fast, and they are so much more powerful.
It is easy to learn to shoot a compound bow and arrow. They bypass and make a lot of things easy for an archer compared to the other traditional bows. Mechanisms such as mechanical releases, and cams that make a 50-pound bow feel like 15-pound bow at full draw, makes compound bow the go-to choice for many new archers.
Still, no matter how easy it is, compound bow can’t shoot itself. You need to have the right skills, know how, and resources so that you can use it to its maximum potential.

Fundamentals of shooting a compound bow and arrow
The basic premise of any weapon is to hit the target accurately. Whether modern weaponry like firearms, or bows; they follow the same principle. If you can consistently hit the target every time then you are a good archer.
It looks very easy when you watch someone shoot. They just pick a bow, effortlessly pull the string, release the arrow, and BAM – it hits the target. But there is so much more going in this entire sequence.
First of all, they are standing in a particular way, they are holding the bow in a certain way. They are also pulling the string to a certain distance, and they are also making many subtle adjustments that eyes miss.
They are following the fundamentals of archery. The fundamentals of archery remain the same no matter regardless of the type of bow you are using.
Good fundamentals distinguish a good archer from a bad one. Likewise, anyone can be a good archer if they follow the fundamentals really well.
Also Read:
- Why is stance important in archery?
- What is the draw weight of a bow?
- Archery finger release technique
- How to do archery for beginners?
- 10 Best Compound Bows For Hunting
Step by step shooting a compound bow
The details of each component of archery mentioned in the steps is discussed in detail further down in the section after this one.
1. Stand in a proper stance
You need to stand in the correct stance before you take the shot. The correct stance, from bottom to top goes like this: have feet shoulders width apart, and have a little bit of open stance. Open stance is the most common stance in any sport, and martial arts.
Your hips, chest, knees, and neck should be straight, and in line with your body.
It’s important to keep your body relaxed at all times. There should be no tension in your body. The tension does 2 debilitation things:
- If you can’t bring the same tension at the same body part every time, then that will be a variable that can throw you off your shot process
- It can cause injuries because you’ll be putting unnecessary load on unneeded muscles
It is easy to replicate the relaxed stance in comparison.
Read: Proper Archery Posture Yields Consistent Shooting
2. Grip the bow
Have a very relaxed grip. If you are holding your bow too tightly then that muscle tension will affect your bow subtly while taking a shot, which you won’t be able to replicate.
3. Nock the arrow
Slide the arrow and put it on the arrow shelf of the bow. Then pull it back, via arrow rest, all the way to nocking point on your string.

4. Hook the mechanical release device that you have onto the D-loop of the string
Pull the string back with your mechanical release. Make sure that your finger is not in contact with the trigger at any point in time.
You will only need to touch the trigger when you are ready to take the shot. Otherwise, it could cause a misfire and can cause injury to someone standing near you, or yourself.
5. Pull back the string to your anchor points
The idea behind anchor points is to have a reference point for your hand to come at the exact same spot every time, in the exact same orientation.
This way you will be shooting your arrow from the exact same spot, and the arrow will come out of your bow in the same trajectory each time.
Read: How to Properly Anchor Your Bow: The 3 Point Process
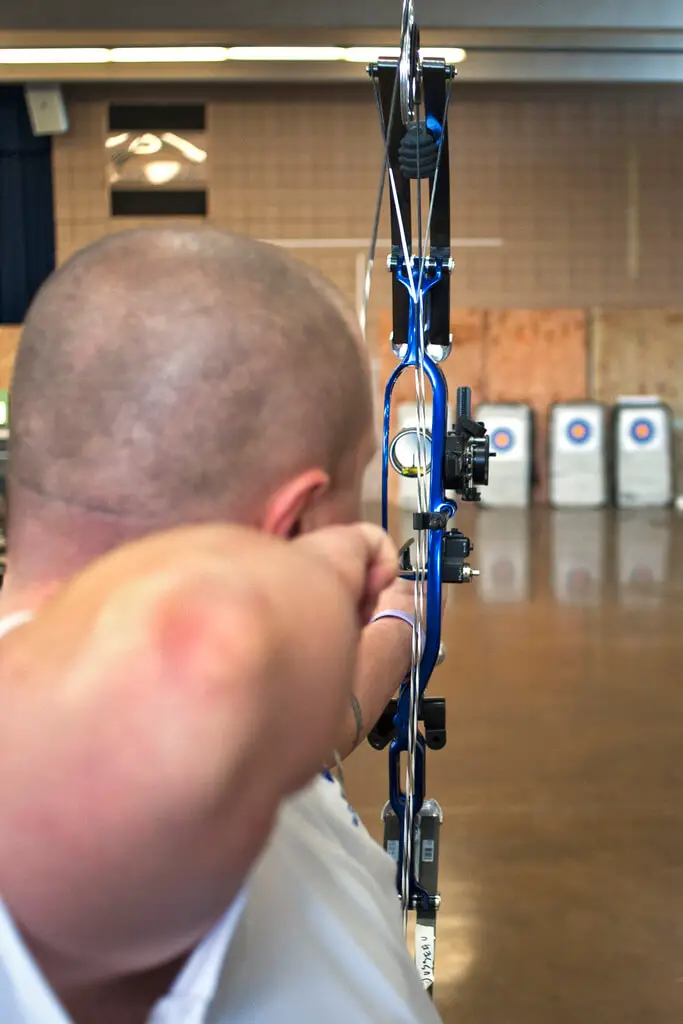
6. Check string picture
String orientation and alignment should be the same every time for a consistent shooting.
If the string is a bit towards left or right, or if your bow is tilted a bit clockwise or anti-clockwise, then you will find that your shots are not accurate.
Experienced archers can do it by feel, but there is an easier way for compound bows. That is peep sight placed on the string.
It is at your eye level. After coming into shooting stance you shall be able to see through peep sight. If it is not happening then the alignment or orientation of your string is a bit off.
Correcting that deviation will reduce the shot error.
Read: String Alignment For Consistent Archery Shots
7. Check your form
When you bring the bow up, it should form a small triangle between your bow arm, chest, and the string arm.
Also check that your:
- back and core muscles are engaged
- legs are straight and knees are not bent
- Chest is dropped just a little bit to give string clearance
- head is straight and not inclined towards any direction
- body is not leaning forward or backward
- body is relaxed and there is no unnecessary tension in your body
8. Take aim with your sight

Keep the focus on target. Overlay the designated sight pin on top of the target before taking the shot.
A sighting tool (sight in short) takes away the guess work out of the equation. If you have good command over your stance and shooting process, sight can aid you to take care of the other part of the archery, that is, aiming.
Sight needs to be pre-configured to use it. Multi-pins sight could help you preset the sight for different distances.
9. Take the shot
When you are ready, press the trigger of your mechanical release.
Your trigger hand should not stop at that point though. The shot does not end there. If you are doing things right, then a sudden weight will be released from your release hand, and it will fly back.
It should happen automatically. This is called follow-through. This is the last part of the shot process.
Components of Compound Bow Archery
1. Correct anchor points
Anchor points provide you the reference point for the exact orientation and direction you should be aiming your shot.
There are many ways to choose the anchor points. A face has many reference points you can chose from, such as, chin, jaw, mouth, lips, teeth, nose, ear, earlobe, back of the ear, neck, cheek.
There are many other points on your body. However, most archers are advised to draw the bow to the face level because it is closest to the eyes and thus making it easier to aim.
If you chose a lower body part such as chest, rib cage, or collar bone, then you are aiming from a low point, farther away from eyes. It is easier to draw to a lower anchor point, however difficult to aim from.
On the other hand, choosing eye level as the reference point has its own challenges. In many forms of traditional and instinctive archery eye level anchors are very common.
However, it is physically more challenging to draw to eye level.
As a compromise, mouth area is considered to be the best of both worlds.
1.1 Best anchor points for a compound bow
You want the anchor points to be repeatable. Bones, being fixed, are much better reference points than soft tissue.
Here’s a list of some of the best anchor points for a compound bow. All of these can be used together, thus providing you multiple points of reference working in sync:
- Back of the thumb touching the jawbone
- Bowstring touching the tip of your nose
- Knuckle (of the index finger) touching the ear lobe
- Kisser button on the string (it shall touch your lips – hence the name kisser)
- Peep sight
Having three or more is ideal because when they all come in sync, you will have a perfect face, string, and shot alignment.
The two biggest criteria for choosing anchor points is that they should be repeatable and comfortable. In case you find them uncomfortable, you can google or youtube to find anchor points that are more suitable to you.
Read: Compound Anchor Point
2. Using peep sight
Peep is a small button with a hole that you place on the string. When you pull back the string, this hole should be in line with your eyes. You see through peep to your target; and overlay the sight pin of your sighting device on the target before taking a shot.
It essentially acts as another anchor point. It anchors the string alignment for your bow. When you are anchored with your bow, the only way to see through peep onto the sight is when your bow is straight. Any deviation there will upset this image.
3. Using sight
Sighting tool (or Sight in short) is the best way to aim in a bow. It is a mechanical device that you mount on top of your bow.
There are pins, or sometimes a dot-on-a-mirror in a sight that you overlay over the target to provide you the exact angle you need to aim your bow to hit the target.
But sight does not work on its own. You need to configure the sight to work for you. Each pin on the sight is pre-configured to shoot a target accurately at a particular distance.
4. Using mechanical release
Mechanical release, or release for short, is a simple contraption of a clipper, and a trigger. You hook the clipper onto a D-loop attached to the string.
You pull back the string using the mechanical release. There are wrist strapping releases that make the task of pulling the string much easier.
When you are all set to shoot, then you press the trigger. The clipper opens up, and cleanly releases the string.
Mechanical release makes the task of archer very easy. Mastering the release of the string can be arduous to say the least. And mechanical release automates this process.
All about using the mechanical bow release
5. Grip correctly
Having a good grip is vital for good archery. If not done right, it can lead to involuntary movement in the bow and thus giving you inconsistent shooting results.
I say grip, but it is mostly supporting the bow between your thumb and the lifeline. That’s it. You can lightly wrap your fingers around, but if you are not experienced doing so, you can easily tighten the fingers around it and mess it up.
You might be wondering that if you are only supporting the bow and not holding it, then it may fall down after the shot when tension is released from it. You are right.
In some cases, the bow is left dangling in your hand. In others, it can fall. To avoid this, you can use a bow sling to keep it from falling off.
6. Correct stance
Stance is one of the most crucial part for a consistent archery.
Any deviation in your stance can be massively reflected on the target, and throw you off by quite a wide margin.
The best way to correct any form faults, or improving your stance is to do blind bow shooting.
Blind bow shooting is standing very close to the target and shoot at it with your eyes closed.
Follow the entire sequence or shot process, right from lifting the bow to follow through after the shot while closing your eyes.
What it does essentially is that it removes the distraction and panic of target from your mind and you can solely focus on your stance and technique.
You will be able to notice subtle issues in your form and you can correct them then and there.
Tips on Gear for compound bow shooting
Selecting the right gear is a homework you have to do when you are starting out. This is a one-time exercise though.
1. Bow
In terms of bow, there are two things that are crucial for your archery performance. Those are draw weight, and draw length. Both can be adjusted on a compound bow.
1.1 Draw weight
Compound bow itself is a very powerful bow. Furthermore, a lot of draw weight is taken care of by the mechanism itself.
You will already be using a heavier draw weight bow in comparison to what you actually would if you were to choose a recurve bow for shooting.
Thus having an ego when it comes to draw weight can be very risky. Pick the right draw weight depending on your current physical capability.
If you are getting tired easily after shooting a couple of arrows, or if you are not able to keep a steady peep sight picture because your hands are shaking from the weight, then you definitely need to consider lowering your draw weight.

1.2 Draw length
Using the right draw length will enable you to use your bow efficiently.
Here are few ways to measure the correct draw length yourself
- Measuring arrow: It is a special arrow with markings on it. when you pull the arrow on your bow and come to your anchors, you can note down the marking on the arrow. This will give you the most accurate reading of your draw length.
- Without equipment: Stretch your hands from side to side, and measure them from tip to tip. Divide it by 2.5. What you get is an approximate draw length for your height.
Read: Compound Bows That Really Fit
2. Arrows
You should use the arrows with similar specifications.
If there is disparity in specifications for two arrows, they will fly very differently and may end up in two very different places.
You will not be able to lock down on the problem. Your stance, sight, estimations will all be off.
Thankfully, bow and arrow manufacturers have researched on this subject in great detail and have come up with methods to ensure maximum compatibility between your bow and your arrows.
Every arrow manufacturer has a chart corresponding to the draw weight and draw length of a compound or recurve bow. They have already done the hard work for you.
If you know your draw length and draw weight, you can refer to the arrow manufacturer’s chart and select the arrow that will be most compatible with your bow.
This saves you lot of headache of finding the right arrows, and a lot of heart-ache due to unexpectedly bad results.
Read: How to Choose Arrows: A Guide
Conclusion
By now you may know how to shoot a compound bow and arrow. There are lot more that goes into the process, but the basics are very simple.
What you need to do is to focus on stance and correct shooting. After a couple of shots testing things out, it would be a really good idea to do the blind bow shooting to get a good idea of your stance.
Then you need to work on your aiming. Remember, aiming comes after you have ironed out issues with your stance. If your stance is correct, the aiming part is relatively easier.
A small deviation due to any reason, being your stance and body, or the equipment, translates to wide gaps on your target.
Lastly, all you need to do now is practice. Tons and tons of practice.
Happy shooting.
If you found this article useful, share it with your friends on Facebook, Twitter, and Pinterest.
References:
- https://www.artofmanliness.com/articles/a-primer-on-the-compound-bow/
- https://en.wikipedia.org/wiki/Release_aid
- https://en.wikipedia.org/wiki/Archery

Hi, I’m Vineet. Creator of DivinioWorld. I am an outdoor enthusiast and absolutely love researching, learning, and applying skills and knowledge in the real world. I started DivinioWorld to share everything I know so that even a beginner can follow the ropes and master the subtle art of outdoors adventure and survival.
19 thoughts on “How to shoot a compound bow and arrow within 1 hour”